

How Do I Enlarge The Background In Gimp
6.17. Sheet Size
The "canvass" is the visible area of the epitome. Past default the size of the canvas coincides with the size of the layers. The command opens the "Set Epitome Canvas Size" dialog that lets you lot overstate or reduce the sail size. You can, if you desire, modify the size of the layers. When you overstate the canvas, you lot create free space around the contents of the paradigm. When you reduce it, the visible area is cropped, however the layers still extend beyond the canvas border.
When you reduce the canvass size, the new canvas appears surrounded with a thin negative edge in the preview. The mouse pointer is a moving cross: click and elevate to move the image against this frame.
six.17.i. Activating the Command
-
Yous tin access this command from the paradigm menubar through → .
6.17.2. Description of the "Set Paradigm Canvas Size" dialog
Figure sixteen.72. The "Set Paradigm Canvas Size" dialog

Sheet Size
- Width; Top
-
You can set the Width and the Height of the canvas. The default units are pixels but y'all can choose unlike units, e.k. percent, if you want to set the new dimensions relative to the current dimensions. If the Chain to the right of the Width and Height is not broken, both Width and Height continue the aforementioned relative size to each other. That is, if y'all change one of the values, the other one also changes a corresponding amount. If you break the Chain by clicking on it, you tin can prepare Width and Height separately.
Whatsoever units you use, information about the size in pixels and the current resolution are always displayed below the Width and Height fields. You cannot modify the resolution in the dialog; if you want to do that, use the Impress Size dialog.
Offset
The Commencement values are used to place the image (the image, non the agile layer) on the sheet. You can see the size and the content of the canvas in the preview of the dialog window. When the sheet is smaller than the image, the preview window shows information technology in a frame with a sparse negative border.
- Ten ; Y
-
The X and Y specify the coordinates of the upper left corner of the image relative to the upper left corner of the canvas. They are negative when the sheet is smaller than the image. Yous tin place the image in different ways (of course, the coordinates can't exceed the canvas borders):
-
by click-and-dragging the image,
-
by inbound values in the X and Y text boxes,
-
past clicking on the modest arrow-heads. This increments the value by one pixel (unit of measurement).
-
And when the focus is on a text box, y'all can use the keyboard pointer keys, Up and Down to change by one pixel (unit), or PageUp and PageDown to change the value by 10 pixels (units).
-
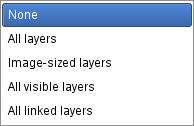
- Layers
-
-
Resize layers: this drop-down list offers you several possibilities:
Figure 16.73. The Resize layers list
-
None: default option. No layer is resized, simply the canvas is.
-
All Layers: all layers are resized to canvas size.
-
Image-sized layers: but layers with the same size every bit the epitome are sized to canvas size.
-
All visible layers: only visible layers, marked with a
 icon, in the Layer Dialog, are sized to canvass size.
 -
All linked layers: only linked layers, marked with a
 in the Layer Dialog, are sized to sail size.
-
-
Make full with: you tin can fill up resized layers with Transparency (default), Background colour, Foreground color, White, Blueprint.
-
Resize text layers: Resizing text layers will make them uneditable.
-
- Centre
-
The Eye button allows you to center the epitome on the canvas. When you click on the Heart button, the commencement values are automatically calculated and displayed in the text boxes.
![[Note]](https://docs.gimp.org/en/images/note.png) | Note |
|---|---|
| When you lot click on the Resize button, the sheet is resized, but the pixel information and the drawing scale of the paradigm are unchanged. If the layers of the epitome did not extend beyond the borders of the canvas before you inverse its size, in that location are no layers on the part of the canvas that was added past resizing it. Therefore, this part of the sail is transparent and displayed with a checky design, and it is non immediately bachelor for painting. You can either flatten the image, in which example you will get an image with a single layer that fits the canvas exactly, or you can use the Layer to Image Size control to resize only the active layer, without irresolute any other layers. Yous can also create a new layer and make full it with the background you want. By doing this, y'all create a digital "passe-partout" (a kind of drinking glass mountain with a removable back for slipping in a photograph). |
half dozen.17.3. Example
Figure xvi.74. Original image
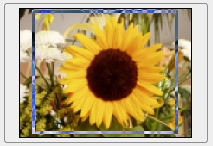
Figure 16.75. Canvas enlarged (layers unchanged)
Effigy 16.76. Canvas enlarged (all layers changed)
6.17.iv. What's Canvas Size useful for?
You may want to add some stuff effectually your prototype: enlarge canvass size, add a new layer that will have the aforementioned size equally the new canvas and and then paint this new layer. That'due south the antipodal of cropping.
You tin also use this command to crop an image:
Effigy 16.77. Resizing canvas
Click on the chain next to Width and Pinnacle entries to unlink dimensions. Past modifying these dimensions and moving image confronting canvas, by trial and fault, you lot can crop the part of the image y'all want. Click on the Center button and then on the Resize button.
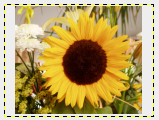
Figure 16.78. Cropped image

How Do I Enlarge The Background In Gimp,
Source: https://docs.gimp.org/en/gimp-image-resize.html
Posted by: rochastemblitrand84.blogspot.com
0 Response to "How Do I Enlarge The Background In Gimp"
Post a Comment